Break Out from Cloud AI: Host Your Own Private LLM
#artificialintelligence #container #genai #kubernetes #llm
In an era where Artificial Intelligence (aka Computational sentience) capabilities are primarily accessed through cloud services, the need for privacy and data sovereignty has become increasingly critical. Organizations handling sensitive information, proprietary data, or personal records often face a dilemma: leverage powerful AI capabilities while potentially exposing confidential data to external services, or forgo AI assistance entirely. Local AI deployment offers a compelling solution to this challenge.
Self-hosting Large Language Models (LLMs) on Kubernetes has been a long-standing goal of mine, which finally materialized when I acquired a second RTX4070 GPU. In this guide, I’ll walk you through how I set up my lab environment to run OpenWebUI with Ollama on a Kubernetes cluster. Many people use Kubernetes as their de facto platform on several reasons.
- Infrastructure Overview
- Current Setup
- 1. Nvidia Driver Configuration
- 2. Nvidia GPU Operator Deployment
- 3. GPU Time-Slicing Configuration
- 4. Deploying Open-WebUI and Ollama
- 5. Exposing the URL
- Performance and Considerations
- Conclusion
Infrastructure Overview
My home lab consists of a self-hosted Kubernetes cluster that runs various services, including this blog. The cluster was rebuilt last year after a host NVMe failure, but thanks to NAS CSI (Container Storage Interface), no data was lost.
Current Setup
Physical GPU Node k8s-04: 1x RTX4070 (dedicated for LLM hosting)
Host OS: Ubuntu 24.04 LTS (Proxmox Guests)
Kubernetes Version: v1.32.1
VM GPU Node k8s-03: 1x Quadro P620 card (in Proxmox guest passthrough mode) for Jupyter Notebook workloads.

I am running the host OS with Ubuntu 24.04 LTS (Proxmox Guests) and Kubernetes v1.32.1. The “k8s-03” has old GPU (Quadro P620) in passthrough mode that I have been using for my Jupyter Notebook work and lab.
But I have decided for this LLM self-hosting, I will use a one physical node for it. Therefore I have added it as worker node(“k8s-04”) and put appropriate label to the node.

1. Nvidia Driver Configuration
For this deployment, I chose to install the Nvidia driver directly on the node rather than using a containerized driver. While the container method is recommended for large clusters, direct installation simplifies maintenance for a single-node setup through standard apt package management.
I used the Ubuntu-provided Nvidia driver package. After installation, verify the setup using the nvidia-smi command:

2. Nvidia GPU Operator Deployment
The next step involves installing the CUDA toolkit and supporting components through the GPU operator, including node feature discovery. I used the Nvidia Helm chart for installation.
First, add the Nvidia Helm repository:
# helm repo add nvidia https://helm.ngc.nvidia.com/nvidia \
    && helm repo update
Create a values file to configure the operator:
# values.yaml
cdi:
  enabled: true # Read more at CDI
driver:
  enabled: false
Deploy the GPU operator:
# helm install --wait --generate-name \
  -n gpu-operator --create-namespace \
  nvidia/gpu-operator \
  -f values.yaml
Verify the deployment and check the validator pod logs:
# kubectl get pods -n gpu-operator
Looked at the “nvidia-cuda-validator” pod logs, this pod(job) will run where GPU operator marked there is GPU exists on the node.

From the pod log it show CUDA is properly installed and working on the node, so we can continue with next steps.
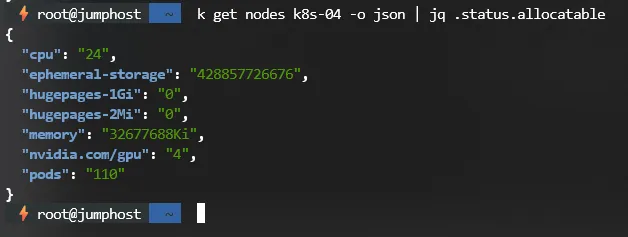
3. GPU Time-Slicing Configuration
Enable time-slicing for better GPU resource sharing. More information can be read at time-slicing for the GPU docs.

If we now query the node status for allocatable resource, we can see:
4. Deploying Open-WebUI and Ollama
Architecture Overview
The deployment follows this high-level architecture:

Storage Configuration
Create a Local Persistent Volume for Ollama:
# k get pv ollama-pv
NAME        CAPACITY   ACCESS MODES   RECLAIM POLICY   STATUS   CLAIM                   STORAGECLASS   VOLUMEATTRIBUTESCLASS   REASON   AGE
ollama-pv   100Gi      RWO            Retain           Bound    open-webui/ollama-pvc                  <unset>                          19d

# k get pv ollama-pv -o yaml
apiVersion: v1
kind: PersistentVolume
metadata:
  creationTimestamp: "2025-01-09T16:08:42Z"
  finalizers:
  - kubernetes.io/pv-protection
  name: ollama-pv
  resourceVersion: "39201474"
  uid: ae5b02a9-86fa-41a8-b0f0-c4ab6db8dbb1
spec:
  accessModes:
  - ReadWriteOnce
  capacity:
    storage: 100Gi
  claimRef:
    apiVersion: v1
    kind: PersistentVolumeClaim
    name: ollama-pvc
    namespace: open-webui
    resourceVersion: "39201472"
    uid: ef445dc4-d235-44ea-8f7b-0371d21f0849
  local:
    path: /mnt/ollama
  nodeAffinity:
    required:
      nodeSelectorTerms:
      - matchExpressions:
        - key: kubernetes.io/hostname
          operator: In
          values:
          - k8s-04
  persistentVolumeReclaimPolicy: Retain
  volumeMode: Filesystem
Create corresponding PVC:
# k get pvc ollama-pvc
NAME         STATUS   VOLUME      CAPACITY   ACCESS MODES   STORAGECLASS   VOLUMEATTRIBUTESCLASS   AGE
ollama-pvc   Bound    ollama-pv   100Gi      RWO                           <unset>                 20d

# k get pvc ollama-pvc -o yaml
apiVersion: v1
kind: PersistentVolumeClaim
metadata:
  annotations:
    pv.kubernetes.io/bind-completed: "yes"
    pv.kubernetes.io/bound-by-controller: "yes"
  creationTimestamp: "2025-01-09T16:08:49Z"
  finalizers:
  - kubernetes.io/pvc-protection
  name: ollama-pvc
  namespace: open-webui
  resourceVersion: "39201476"
  uid: ef445dc4-d235-44ea-8f7b-0371d21f0849
spec:
  accessModes:
  - ReadWriteOnce
  resources:
    requests:
      storage: 100Gi
  storageClassName: ""
  volumeMode: Filesystem
  volumeName: ollama-pv
status:
  accessModes:
  - ReadWriteOnce
  capacity:
    storage: 100Gi
  phase: Bound
Deploying Components
Now I have storage ready, next I will deploy Ollama statefulsets and use the PVC I have just created above. Note the “nodeSelector” in the manifest to ensure the pod only run on the node where I want it to always run.
# k get sts ollama -o yaml
apiVersion: apps/v1
kind: StatefulSet
metadata:
  creationTimestamp: "2025-01-09T16:17:37Z"
  generation: 4
  name: ollama
  namespace: open-webui
  resourceVersion: "46397926"
  uid: c1d831b8-a375-4322-b366-b1626c394253
spec:
  persistentVolumeClaimRetentionPolicy:
    whenDeleted: Retain
    whenScaled: Retain
  podManagementPolicy: OrderedReady
  replicas: 1
  revisionHistoryLimit: 10
  selector:
    matchLabels:
      app: ollama
  serviceName: ollama
  template:
    metadata:
      creationTimestamp: null
      labels:
        app: ollama
    spec:
      containers:
      - image: ollama/ollama:latest
        imagePullPolicy: Always
        name: ollama
        ports:
        - containerPort: 11434
          protocol: TCP
        resources:
          limits:
            cpu: "16"
            memory: 24Gi
            nvidia.com/gpu: "2"
          requests:
            cpu: "2"
            memory: 8Gi
        terminationMessagePath: /dev/termination-log
        terminationMessagePolicy: File
        tty: true
        volumeMounts:
        - mountPath: /root/.ollama
          name: ollama-volume
      dnsPolicy: ClusterFirst
      nodeSelector:
        node-role.kubernetes.io/rtx-gpu: ""
      restartPolicy: Always
      schedulerName: default-scheduler
      securityContext: {}
      terminationGracePeriodSeconds: 30
      volumes:
      - name: ollama-volume
        persistentVolumeClaim:
          claimName: ollama-pvc
  updateStrategy:
    rollingUpdate:
      partition: 0
    type: RollingUpdate
Inspect “ollama-0” pod logs for any error, especially with local storage, I have to change the permission on the local folder based on pod uid for the pod to be able to do R/W operation on the storage. After the permission on the local host disk has fixed, the logs show show something like this as its running properly:

Now I have Ollama pod running successfully, I can now move to deploy the open-webui. But before that, open-webui also required a PVC, and for this case since there is no big data needs to be transferred I used the Synology NFS CSI.
# k get pvc  open-webui-pvc
NAME             STATUS   VOLUME                                     CAPACITY   ACCESS MODES   STORAGECLASS              VOLUMEATTRIBUTESCLASS   AGE
open-webui-pvc   Bound    pvc-c429b961-2a10-4b80-abbd-08c80064c5ee   200Gi      RWX            synology-csi-nfs-retain   <unset>                 21d

# k get pvc  open-webui-pvc -o yaml
apiVersion: v1
kind: PersistentVolumeClaim
metadata:
  annotations:
    pv.kubernetes.io/bind-completed: "yes"
    pv.kubernetes.io/bound-by-controller: "yes"
    volume.beta.kubernetes.io/storage-provisioner: csi.san.synology.com
    volume.kubernetes.io/storage-provisioner: csi.san.synology.com
  creationTimestamp: "2025-01-08T13:20:55Z"
  finalizers:
  - kubernetes.io/pvc-protection
  labels:
    app: open-webui
  name: open-webui-pvc
  namespace: open-webui
  resourceVersion: "38762760"
  uid: c429b961-2a10-4b80-abbd-08c80064c5ee
spec:
  accessModes:
  - ReadWriteMany
  resources:
    requests:
      storage: 200Gi
  storageClassName: synology-csi-nfs-retain
  volumeMode: Filesystem
  volumeName: pvc-c429b961-2a10-4b80-abbd-08c80064c5ee
Once the PVC is ready, then I deployed open-webui. You might notice “OPENAI_API_BASE_URL”, I used this to test vLLM with open-webui, it can be ignored for now.
# k get deployment open-webui-deployment -o yaml
apiVersion: apps/v1
kind: Deployment
metadata:
  creationTimestamp: "2025-01-08T13:20:55Z"
  generation: 7
  name: open-webui-deployment
  namespace: open-webui
  resourceVersion: "46395222"
  uid: bea3fdc9-b638-4c23-9837-ce143f0322b1
spec:
  progressDeadlineSeconds: 600
  replicas: 1
  revisionHistoryLimit: 10
  selector:
    matchLabels:
      app: open-webui
  strategy:
    rollingUpdate:
      maxSurge: 25%
      maxUnavailable: 25%
    type: RollingUpdate
  template:
    metadata:
      creationTimestamp: null
      labels:
        app: open-webui
    spec:
      containers:
      - env:
        - name: ENABLE_RAG_WEB_SEARCH
          value: "true"
        - name: RAG_WEB_SEARCH_ENGINE
          value: duckduckgo
        - name: ENABLE_OLLAMA_API
          value: "false"
        - name: OPENAI_TOKEN_KEY
          value: abc123
        - name: OPENAI_API_BASE_URL
          value: http://vllm.open-webui.svc.cluster.local/v1
        image: ghcr.io/open-webui/open-webui:main
        imagePullPolicy: Always
        name: open-webui
        ports:
        - containerPort: 8080
          protocol: TCP
        resources:
          limits:
            cpu: "4"
            memory: 2Gi
          requests:
            cpu: 1500m
            memory: 1500Mi
        terminationMessagePath: /dev/termination-log
        terminationMessagePolicy: File
        tty: true
        volumeMounts:
        - mountPath: /app/backend/data
          name: webui-volume
      dnsPolicy: ClusterFirst
      restartPolicy: Always
      schedulerName: default-scheduler
      securityContext: {}
      terminationGracePeriodSeconds: 30
      volumes:
      - name: webui-volume
        persistentVolumeClaim:
          claimName: open-webui-pvc
Now we have installed both Ollama and open-webui.

Now I want to expose this via ingress to https://chat.aizuddinzali.com and I can use it from anywhere.
5. Exposing the URL
Now I want to expose the open-webui as HTTPS endpoint using ingress. First I created the required services:

# k get svc ollama-service -o yaml
apiVersion: v1
kind: Service
metadata:
  creationTimestamp: "2025-01-08T13:20:55Z"
  name: ollama-service
  namespace: open-webui
  resourceVersion: "38762608"
  uid: f3c039b5-94be-45a5-9c6b-64b3ba6d7539
spec:
  clusterIP: 10.200.178.186
  clusterIPs:
  - 10.200.178.186
  internalTrafficPolicy: Cluster
  ipFamilies:
  - IPv4
  ipFamilyPolicy: SingleStack
  ports:
  - port: 11434
    protocol: TCP
    targetPort: 11434
  selector:
    app: ollama
  sessionAffinity: None
  type: ClusterIP
# k get svc open-webui-service -o yaml
apiVersion: v1
kind: Service
metadata:
creationTimestamp: "2025-01-08T13:20:55Z"
name: open-webui-service
namespace: open-webui
resourceVersion: "38762613"
uid: b5ab7581-9220-44fb-b93f-379e04c02ecf
spec:
clusterIP: 10.200.238.149
clusterIPs:
- 10.200.238.149
externalTrafficPolicy: Cluster
internalTrafficPolicy: Cluster
ipFamilies:
- IPv4
ipFamilyPolicy: SingleStack
ports:
- nodePort: 32527
port: 8080
protocol: TCP
targetPort: 8080
selector:
app: open-webui
sessionAffinity: None
type: NodePortNext I am exposing open-webui using ingress with the Letsencrypt cert-manager certificate auto-management.
# k get ingress open-webui-ingress-chat -o yaml
apiVersion: networking.k8s.io/v1
kind: Ingress
metadata:
  annotations:
    cert-manager.io/cluster-issuer: letsencrypt
    kubernetes.io/ingress.class: nginx
    nginx.ingress.kubernetes.io/proxy-body-size: "0"
    nginx.ingress.kubernetes.io/proxy-read-timeout: "600"
    nginx.ingress.kubernetes.io/proxy-send-timeout: "600"
  creationTimestamp: "2025-01-08T13:20:56Z"
  generation: 1
  name: open-webui-ingress-chat
  namespace: open-webui
  resourceVersion: "42647452"
  uid: 44fd86b9-c9e4-4ac1-a0b3-0d4eca48176c
spec:
  rules:
  - host: chat.aizuddinzali.com
    http:
      paths:
      - backend:
          service:
            name: open-webui-service
            port:
              number: 8080
        path: /
        pathType: Prefix
  tls:
  - hosts:
    - chat.aizuddinzali.com
    secretName: open-webui-chat-tls
Now I can access it via https://chat.aizuddinzali.com (after completed the initialization wizard). Once logged in I can now pull model I want to use from Ollama.

That was how I setup self hosting LLM on my Kubernetes cluster. Running model with 14b parameters and less can give a decent token per seconds compared to larger model. I might need to upgrade the node physical RAM from 32GB to 128GB sooner and see if the larger model can utilized the unified memory without significant performance lost or not.

Running self-hosted LLM can provide us better privacy and ensure sensitive prompt is locally contained. In my case I use mix of public providers and my local hosted LLM above depends on why type of prompt I am providing to the AI.
Performance and Considerations
-
Models with 14B parameters or less provide decent performance (tokens/second)
-
Future upgrade plans include increasing node RAM from 32GB to 128GB
-
Self-hosted LLM provides better privacy for sensitive prompts
-
Consider mixing public providers and local hosting based on use case
Conclusion
Self-hosting LLMs on Kubernetes provides a flexible and secure environment for running AI models. While it requires careful consideration of hardware requirements and configuration, the benefits of privacy and control make it a worthwhile setup for organizations handling sensitive data.
Remember to monitor resource usage and adjust configurations based on your specific workload requirements.